

Introduction
 With the sharp rise in home producing and recording, any aspiring singer should be armed with the knowledge on how to record vocals at home.
While at first, it may seem complicated, it’s actually very easy to record your voice at home.
Thanks to advancements in modern equipment, you can even get highly professional results no matter your skill level, from beginner to advanced.
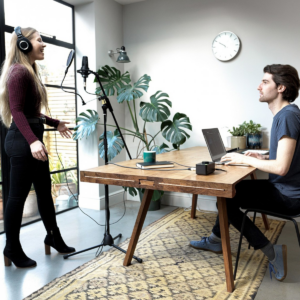
We thought it would be useful to break down what equipment you need and how best to set it up to create a flexible recording environment in your own home.
Why do we need to record vocals at home?
The role of the producer in a professional studio is not to be understated. However, this doesn’t mean that you need to record your vocals with a producer in the room with you. There are many instances where getting your ideas down and exploring your creativity are equally as important as having an experienced professional there with you to get the best takes.
Singer-songwriters, you have a chance to get your ideas recorded before sending them to labels to try and land yourself a deal. Band singers can record their vocal parts over instrumentals to send to the rest of the band. Voice-over actors can create a comfortable space in their own home to do their day-to-day recordings and save on travel costs to and from studios. Or, more simply, it can be used as a way to get proper practise in and improve your singing.
What are the advantages of recording your own vocals at home?
As touched on earlier, recording in your own home gives you more freedom and flexibility to record when it suits your lifestyle, allowing you more time to improve your ability. This, of course, isn’t the only benefit. In fact, there are several reasons why recording at home can be more advantageous than dedicated studios.
You can demo your lyrics within the context of the song to make sure they fit rhythmically, making any changes once listening back. Phrases can often work on paper, but when the time comes to sing, they may not always work.
For singers in bands, listening to an instrumental of a song can sometimes be uninspiring. Without the main melodic element, songs can often lose their emotional impact. Hearing how a song will sound with lyrics can give you the confidence to go into a recording studio knowing how the end product should sound in all its glory.
Having a space that’s your own which doesn’t charge by the hour is ideal for working out harmonies. Demoing harmonies at home will greatly reduce the time needed in expensive studios, allowing you to focus more on getting the best performances possible.
Of course, you can use your home recording time to hone your craft, practising properly with dedicated exercises to strengthen your vocal muscles and improve your breathing techniques. It’s also a great time to sit down and work out your vocal range. Knowing your limits before going into a studio or writing melodies is an essential aspect of being a professional singer.
As well as the points listed above, there are many other examples of why recording your own vocals at home is advantageous. So, let’s take a look at the equipment you will need and how best to set it up.
What equipment will you need?
Thankfully, recording your voice requires much less equipment than most instruments. Only a few pieces of vital equipment are necessary to get the job done professionally. See below for our comprehensive guide:
Microphones
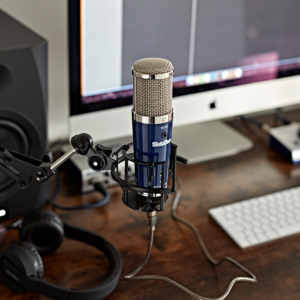
 Perhaps the most obvious of all – a microphone! A means to record your voice. This will typically be the most expensive part of any at-home vocal recording setup, but that doesn’t mean you need to break the bank to get quality.
Traditionally, condenser microphones are ideal for recording vocals. They offer a more detailed sound than dynamic microphones, capturing the higher frequencies more naturally with an extended frequency range. These upper treble frequencies are essential for vocals as they give your voice air and articulation.
Here are our suggestions for the best vocal microphones for home recordings for beginners:
SubZero SZC-800 Condenser Microphone with Switchable Polar Patterns – An excellent introduction to the world of condenser microphones. The SZC-800 offers unbeatable value, with an extended frequency range of up to 18kHz to capture all the detail of your voice.
Audio Technica AT2020 Cardioid Condenser Microphone – Enjoy a rich and nuanced sound that is sure to bring out the best in your voice. Featuring an extremely low noise floor, every note of your dynamic vocal performance will be captured with immense clarity.
Rode NT1-A Vocal Recording Pack – An industry classic. A well-rounded sound at an attractive price point. The full-range frequency response from 20Hz to 20kHz coupled with a large 1” capsule and gold-plated diaphragm delivers premium audio for your vocals.
Aston Microphones Origin Cardioid Condenser Microphone – Expertly engineered and constructed from premium-grade components, the Origin delivers a warm, vintage-inspired tone with depth and warmth. This makes it perfect for complementing vocal recordings. You will need to pick up their proprietary shock mount as the microphone does not come included with one.
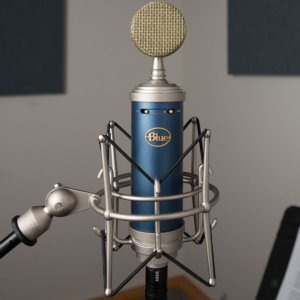
Blue Bluebird SL Condenser Microphone – Our top pick! The Bluebird SL boasts completely transparent audio, letting you hear your voice exactly the way it sounds. Perfect for recording vocals, the Bluebird SL delivers extended upper-range clarity and a smooth and natural mid-range.
Audio interface
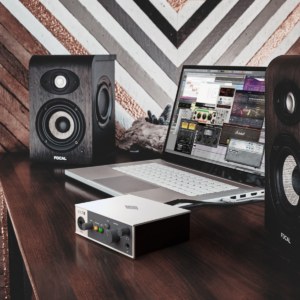
 This essential piece of the puzzle bridges the gap between your microphone and your computer, allowing you to record into your chosen software.
A good quality audio interface is vital in achieving a professional sound as these are what convert the signal from your microphone into digital audio in your computer. We’ve compiled a few of our favourite audio interfaces for singers and vocalists below:
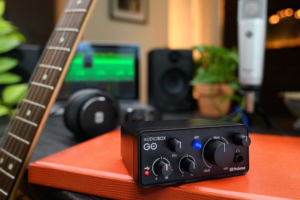
PreSonus AudioBox GO – Extremely compact and functional, the AudioBox Go boasts excellent sound quality and includes premium software for good measure.
Steinberg IXO12 – An excellent interface with a 24-bit/192kHz audio resolution for crystal-clear sound quality.
Focusrite Scarlett Solo (3rd Gen) – An industry classic. Perfect for singers, the Solo features the revered ‘AIR’ mode that simulates high-end vintage preamps for a classic and detailed vocal sound.
Universal Audio Volt 1 USB Audio Interface – Our top pick, the Volt 1 is powered by a transformative ‘vintage’ mode. With the press of one button, you can record ready-made, warm and full-sounding vocals.
USB microphones
 For the economically conscious singers, there is another option which will cut down the equipment needed for your set-up.
A USB microphone presents the opportunity for ‘plug-and-play’ connectivity to your computer or laptop. This eliminates the need for an audio interface, however, and so it offers slightly reduced audio quality in exchange for monetary savings and added convenience. See our picks below:
SubZero SZC-600 USB Condenser Microphone – 16-bit recording and a broad frequency response from 20Hz – 18kHz will deliver fantastic audio quality for recording vocals at this price point.
Presonus Revelator Dynamic USB Microphone – Ideal for beginners that are looking for polished vocal sounds out of the box. Eight unique presets help you achieve professional sounds immediately and when combined with the included DAW software, you have everything you need to record.
Shure MV7+ USB/XLR Podcast Microphone, Black – A premium choice with unrivalled clarity for USB microphones. Innovative Voice Isolation Technology ensures a highly directional pick-up that focuses purely on your voice, meaning it stands out with clarity against any background noise.
Software
Your digital workstation where you record your vocals. Referred to as a DAW (digital audio workstation), the world of software can be slightly confusing and daunting. If you’re unsure of how a DAW can work for you, we’d recommend reading our expert guide here.
Our software pick:
PreSonus Studio One 5 Professional – The most beginner-friendly DAW on the market at an affordable price, with a deep layer of advanced composition options for when your skills and needs change.
Headphones
Hearing yourself during recording and playback is essential. A good pair of headphones offers a controlled environment to listen to your voice in great detail. For vocal recordings, a closed-back pair of headphones is the gold standard as these will not bleed any sound into your microphone when you are recording.
See our picks below:
SubZero SZ-MH200 Monitoring Headphones – The closed-back and over-ear design deliver effective sound isolation for your vocal recordings. A non-slip headband produces maximum comfort, even during long sessions.
Sennheiser HD 200 PRO Closed-Back Headphones – Packs the HD power into an affordable and extremely comfortable headphone. Stellar noise isolating ensures no bleed will leak into your vocal recording.
Reflection filter
An often forgotten and undervalued piece of equipment, the reflection filter is used behind your microphone to stop any sound from bouncing off the walls and reflecting back. Eliminating these reflections is key for reducing the ‘room sound’ you get in your microphone. Removing this room sound keeps your recording crystal clear and puts your vocals at the front and centre. It’s like stepping into your own personal vocal booth.
See our pick below:
Home Studio Microphone Reflection Filter by Gear4music – Made from high-quality foam in a multi-layer pattern. The foldable design makes it ideal for hiding away when not in use.
Pop shield
The ultimate microphone accessory, a pop shield helps to reduce any plosives and sibilance in your voice. These are the harsh ‘p and b’s and ‘s’ sounds respectively. Removing these from your recording will give you a clean sound that doesn’t sound too harsh or boomy.
SubZero Vocal Pop Shield – The curved design cleverly wraps around the body of your microphone to ensure perfect coverage from every angle.
Accessories
No vocal recording studio is complete without them. Simple and essential tools such as cables to microphone stands will get you up and running in full swing.
How to connect and set up your equipment
Now that you’ve got all of your equipment together, it’s time to get it all set up and optimised for vocal recordings!
Step one – Microphone and microphone stand
 First, we need to get our microphone stand ready. We would recommend placing your microphone stand towards the corner of a room, but not completely in the corner, for the best sound. Adjust your microphone stand to roughly head height and get that locked in position using the grip on the pole.
Next, follow the instructions in your reflection filter package and attach your reflection filter to the microphone stand.
Now we can get the microphone into position.
Each microphone we compiled comes with its own shock mount. The tip of the microphone stand has a threaded screw and should simply screw into the base of the shock mount. It’s important to remember to face the shock mount in the right direction. The back of the shock mount should be facing your reflection filter and the front should be facing you and where you will stand to sing.
Once done, following the instructions provided to you, attach your microphone to the shock mount. Make sure it’s not over-tightened to avoid any potential damage. Here you will also need to make sure the microphone is pointing towards you. The front of the microphone is usually indicated by the company logo on the front.
Next, we need to attach the pop filter. The clamp of the pop filter simply attaches to your microphone stand and is then tightened using the screw to ensure it does not move. The pop filter should be placed at the same height as your microphone, roughly 2-3 inches away from your mic, completely covering the front.
Now that your microphone and stand are all set up, you can adjust the height of the microphone stand to make sure it’s comfortable and in line with your mouth when you sing.
Step two – Connecting your microphone to your audio interface
 Now your microphone is set up perfectly for you, it needs to be connected to your audio interface for recording.
Before any connections, you should first consult the box your audio interface was delivered in as this will contain information about registering your product online. It will also include website information to download all the necessary drivers and applications for your interface to work with your computer or laptop.
With that out the way and your computer ready with all the downloads needed, we can start to connect to your system together. With only two cables needed to get your system up and running, it’s easy and straightforward to connect your microphone to your audio interface.
Firstly, a USB cable should have been provided to you in the box of your audio interface. Connect the USB cable from your audio interface to your computer and then double-check the sound settings in your computer.
On Windows you will find this in Settings – System – Sound – Input – Choose your input device. On Mac, you will find this in System Preferences – Sound – Output/Input.
If you can see the name of your audio interface in these settings when you have connected your USB cable, then you are good to go. If this doesn’t show, we’d recommend checking the drivers and re-installing if necessary.
The second and last cable is the XLR cable. The Female end of the cable with no pins and three connection points will plug into your microphone, make sure you listen out for a ‘click’ to know that it’s plugged in properly. The Male end of the cable with three pins then plugs into the input of your audio interface.
Step three – Connecting headphones
Each of our top audio interface picks listed earlier have a dedicated headphone output. They all have a drawing of headphones above the input and all you need to do is connect your headphones here. You might need to use the included adapter to fit the connection size.
Step four – Setting levels
 Your microphone and headphones are connected, your audio interface is powered up. What’s left to do now is set some levels for recording your vocals.
On the front of the audio interfaces we have suggested, there is a small dial labelled ‘Gain’ (or 0-50 on the PreSonus AudioBox GO). This dial is what sets the input volume of your microphone to your audio interface. Next to the input or ‘Gain’ dial is an LED light to indicate if you are distorting your input or not. More on this soon.
The independent headphone socket should also have a dial above that lets you control the level of the headphone volume.
We recommend starting with both the Headphone and Gain dials at halfway. This means that you can adjust them up or down depending on your needs.
Now it’s time to test the levels you have set. To do this, you’ll need to start singing in your normal singing voice and keep one eye on your audio interface.
As mentioned earlier, the audio interface has a small LED light on it that tells you the level. The golden rule to follow is that a green LED light is a good signal that doesn’t have any clipping or distortion and a red LED light means the levels are too high and you are clipping your interface.
Singing in your normal and natural voice is the best way to test the levels. If you sing too quietly, you’ll end up needing to turn up the gain dial which means that if you come to record your vocals and start singing louder, you might end up clipping your audio interface and getting a red LED.
Conversely, singing too loud will mean you turn your audio interface down if it starts to clip and go red. Then when the time comes to record, your levels will be too quiet.
With your headphone level, it’s really down to personal taste. You will need to have the volume above the level of what you hear in the room so you can isolate the recorded sound of your vocals, but not too loud that it’s uncomfortable for long periods.
Step five – Setting up your DAW
Levels are done and you’re chomping at the bit to record. The last thing we need to do is get your DAW up and running. Going into specific detail in this article may not be the most effective method of learning your DAW as it’s a very visual and hands-on experience.
Thankfully, PreSonus have their own dedicated learning platform on how to use Studio One from scratch. This video series covers all the details you need to set up tracks and record your vocals at home, using beginner-friendly language to make sure you can follow along.
These can be found here:
Of course, if you find yourself with some questions, you can always get in touch with other Studio One users through the online PreSonus forum:
Step five – Have fun!
We welcome you to the world of home vocal recording and encourage you to enjoy your time doing it. It’s a chance to try something new, learn a new skill or improve on the talent you already have. Music is an art form that everyone deserves the opportunity to explore, and having a creative outlet in the comfort of your own home can do wonders for your wellbeing. Get creative and start recording!
Recording tips and tricks
Get your position right
 Small differences can make big changes when recording. This is particularly true when recording vocals.
The phenomenon known as the ‘proximity effect’ can completely alter the way your voice sounds when recording. Put simply, the proximity effect refers to how close you stand to the microphone when singing, and the subsequent change in sound this will have.
Standing too close to the microphone will create a more bass-heavy sound as the distance between your voice and the microphone is reduced. On the other hand, standing too far away from the microphone will create a thin and sometimes weak sound.
There will always be a sweet spot that gives you the best sound for the performance and this will vary depending on your voice, the microphone and the pop shield used.
Try starting roughly 6-8 inches away from the microphone and singing a consistent pitch. You can then move your head forwards and backwards in small increments to hear how the timbre changes. Of course, with your new recording setup, you can record the differences to hear the response of your voice to find what suits your recording best.
It’s also worth taking into account the tilt angle of your microphone as this can alter the sound of your vocal recording.
Lowering the microphone and tilting upwards will produce a brighter and more detailed sound, this can be ideal for delicate pop female vocals. Additionally, aiming the microphone down towards the singer from above will enhance the low-end. This is perfect for full-bodied male rock singers to get more ‘chest’ from the voice for a thicker sound.
Customise your microphone
You may have noticed that most of our microphone suggestions have additional switches on. For example, the Blue Bluebird SL features two switches, one with a line-drawing and the other with a switch for -20dB. These are a high-pass filter and input pad respectively.
Put simply, these switches help you tailor your microphone to your needs.
For vocal recordings, these can be excellent tools to get the best sound for your recording. Switching on the high-pass filter will effectively remove any unwanted low frequencies from things such as noisy computer fans or outside noise. Switching this on will keep your recording crystal clean and clear and we would recommend experimenting to see how this can help you.
Using an on-board input pad reduces the volume of sound going into your microphone.
For singers who are into genres such as heavy metal, punk and rock, you may find some sections where you are raising your singing level to the extreme, using techniques such as screaming or shouting. Without using the pad, you can cause clipping and unwanted distortion in your signal. Experiment with using the pad for very loud singing sections and then switching it off for more conventional singing techniques.
Find out more
Shop now | All vocal microphones
Shop now | Condenser microphones


")


0 Comments