

Looking to start a podcast and want to know what to get? You’re in the right place. This is our guide to the best podcast equipment you need to get started or the best ways to upgrade your current setup. We’ll cover microphones, headphones, audio interfaces, mixers, software, acoustic treatment, and accessories.
So, whatever you’re looking for, we have some information that should help you navigate the podcast gear you need.
In a hurry?
To begin podcasting, we recommend the following equipment:
- Microphone(s)
- Headphones
- Recording device or computer
- Recording and editing software or a Digital Audio Workstation
While these aren’t absolutely necessary, we’d also recommend the following accessories:
Our recommendations for an all-in-one setup
We suggest the Rode RodeCaster Pro II Bundle, complete with the RodeCaster Pro II interface, Rode Podmic mic, and Gear4music HP-210 headphones. The interface has a high-performance quad-core engine, Revolution microphone preamps, Bluetooth and WiFi connectivity, a 5.5″ touchscreen, Aphex built-in processors for emulations of classic studio hardware units, and more – it’s an extremely comprehensive production solution.
If you want a more compact version, we recommend the Rode Rodecaster Duo Bundle. The Rodecaster Duo interface is a streamlined version of the RodeCaster Pro II, but still boasts Revolution preamps and a quad-core engine for pristine sound quality and powerful processing technology.

The best podcast equipment
Microphone(s)
There are a lot of different microphones on the market, so what do you need?
For starters, you’ll need at least one microphone for yourself, and depending on how and who you record, at least one other for guests or co-hosts. You need a good-quality microphone first and foremost if you want your voice and podcast to sound good.
So, make sure you have a microphone that’s convenient and reliable and sounds good to your ears.
USB vs. XLR
There are two main options for microphone connectivity: USB or XLR. USB connectivity usually utilises a USB-C connection, which lets you plug directly into a recording device, like smartphones, tablets, computers, or a handheld recorder. This is extremely convenient and can help eliminate the need for an audio interface or mixer.
XLR microphones are of a higher fidelity than USB for two reasons. One, they’re balanced connectors, which means they have minimal possible noise, and resist interference better. Two, USB microphones add an extra stage of digital-to-analogue conversion, which can introduce some minor signal degradation.
They’re also more reliable due to their latching system, meaning that accidental unplugging is far less likely. The trade-off for this functionality is that XLR microphones need an audio interface or mixer to be plugged into a computer for recording.
If you want a rundown of our microphone recommendations, check out our list of the 14 best budget USB microphones and our favourite XLR microphones.
Condenser vs. dynamic
 Now, what kind of microphone capsule do you want? This really comes down to the sound you want to achieve.
Dynamic microphones are a little less sensitive and tend to be darker and less detailed than their condenser counterparts. However, this lack of sensitivity is a benefit in many ways, being able to handle louder sounds without distortion.
These podcast mics are usually associated with a stereotypical “broadcast sound” with big low-frequency and high-frequency presence and a scooped midrange, but other sound characteristics are on the market too.
The Rode Podmic included in our recommended setups above is a quintessential example of a dynamic podcast mic with these characteristics. It has a custom dynamic capsule to deliver a rich and silky “broadcast-ready” sound.
Condenser mics are a lot more detailed and tend to have a fuller, more balanced frequency response, with a little boost to high-frequencies that adds a smooth high-fidelity sheen to a voice. This detail offers a different vocal sound characteristic to choose from while podcasting.
The trade-off is that condenser mics require phantom power to be used, and can be more sensitive to loud sounds. They can distort at higher volumes or fluctuations in volume and can pick up background noise in untreated rooms, and plosives or handling noise, so consider this when picking your mic!
Wireless mics
For convenience and freedom of movement, it’s hard to argue with the potential of wireless microphones. Wireless mics come in a range of form factors and capsule designs – from dynamics to condensers, as well as handheld, lavalier, or headset microphones.
Wireless systems are great for reducing the inevitable tangle of wires that comes with setting up audio equipment, making podcasting setups streamlined. They’re especially great for podcasts with a video element, or any podcast where you’re actively moving around, travelling, or carrying out activities on-air.
There are a few downsides, though. Firstly, they can be technically complex to set up. The more experience you gain, the easier it’ll become, but especially starting out, there can be a lot to consider.
Secondly, wireless system licensing is a major factor to consider as this determines the legality of their use within a given country. We include maps on all of our wireless system listings that indicate licensing of the frequency bands – some regions will be license-free, others will require a license, so check this before you buy! You also need to beware of interference and channel setups.
Headphones
 Headphones are key to listening back to your voice as you record, as well as hearing the voice of any co-hosts and/or guests on your podcast, any sound effects or music you use, and ad playback. Anything you need to monitor should go through your headphones. So, first things first: why headphones?
Headphones are the ideal choice for monitoring while podcasting mostly because they’re unobtrusive, affordable, and won’t create feedback (the microphone won’t pick up the signal from them like they would with traditional monitor speakers). This is the same reason most radio presenters will use headphones too.
So, how do you pick a set of headphones? Ultimately, you want something comfortable for long listening sessions that’s well-cushioned and doesn’t overheat. But there are two other factors to consider. First, wired or wireless? For podcasting, you’ll want wired headphones as these will connect to an audio interface or mixer to receive the monitor mix far more easily.
Wireless headphones aren’t great for podcasting because they can experience more latency – a delay between when the signal happens and when you hear it – and they’re harder to connect to other podcasting audio equipment for monitoring.
The second major consideration is whether you want open-back or closed-back headphones. Open-back headphones are more natural sounding, less susceptible to overheating, and not as fatiguing on the ears. However, while recording, the sound can leak out of the open earcups and back into the microphone, creating minor background noise, or feedback at worst.
Open-back headphones are better for monitoring sound afterwards, in a quiet studio environment.
So, while investing in a set of open-backs would be great if you want to switch to a different set while editing your episode later, closed-backs are the way to go while you’re recording.
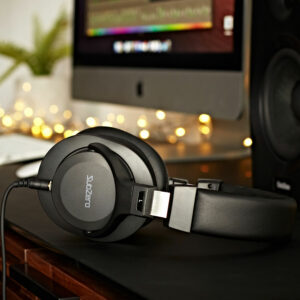
SubZero’s HFH100 Hi-Fi Headphones are a great example of what you might want to look for. Their closed-back design prevents feedback and noise from going into the microphone, their soft headband and cushioned earcups are extremely comfortable over long listening sessions, and their 40mm drivers deliver an accurate sound that’s great for monitoring.
Audio Interface
 An audio interface may not be entirely necessary in certain setups, like if you’ve decided to run your podcast audio on a dedicated mixer, or you’ve invested in a USB microphone.
However, it can be a great central hub for a range of audio tasks. An audio interface will often have a microphone preamp to connect an XLR microphone to, as well as a built-in headphone amplifier to monitor your audio.
Audio interfaces can also provide phantom power if you’ve chosen to use a condenser microphone, and many of them come bundled with useful audio software – which we’ll discuss more later. In addition to this, many modern interfaces are starting to offer more sound tweaking options, like preamp models, compression, and low-cut filters to polish your sound.
If you’re going with an XLR microphone – either dynamic or condenser, we’d recommend an audio interface. Make sure you pick one with as many preamps built into it as microphones you want to use at once. They’re also incredibly useful if you do other work with audio – like streaming, videos, voiceover recordings, or music.
So, for the right audio interface for you, it really depends on what you need to record. If it’s just you, a compact single-input interface will do the trick easily. But what if you have guests? You’ll need more inputs for mics and more outputs for headphones!
One particularly unique USB interface designed for content creators is the Zoom PodTrak P2. It’s equipped with two USB mic inputs, two headphone outputs, and handy features that ensure a professional-grade sound, such as a mix-minus function for eliminating echo and feedback during call-in interviews. However, what’s really great about this audio interface is the AI Noise Reduction. This identifies and removes background noise, which is great for poorly treated rooms or busy spaces – your voice will always be heard clearly.
There’s also built-in sound processing: a tone function to enhance vocal clarity and a compressor to keep volume consistent.
If you’re new to podcasting, this audio interface is perfect – and it comes as part of a bundle, including mics, headphones, cables, and stands for extra convenience.
Check out our list of the best audio interfaces for more recommendations to suit your setup.
Computer and software
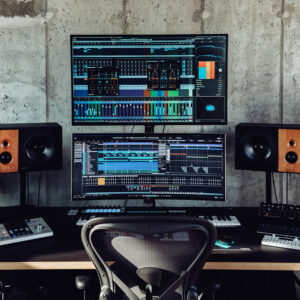 A computer will probably be the central hub of your podcasting setup. It can serve a range of functions, but having a computer as a recording device and editing machine tends to be what you need at the very least. As such, you’ll need software that you can record to and edit your episode with later.
For recording and editing, there’s a lot of free software available, but if you’ve picked up an audio interface, you’ll probably get access to the extra flexibility and power of a Digital Audio Workstation, or DAW. DAW companies tend to pair with mixer and audio interface manufacturers to offer free trials or introductory versions of their software, and for most podcasting setups, this will be more than powerful enough to do the job.
Which DAW you choose is up to you, and largely up to preference, but leading brands like Ableton Live, Bitwig, Cubase, FL Studio, Pro Tools, and Studio One are all capable of recording and editing podcasts.
Most DAWs share similar functionality but have distinct layouts and different purposes. These DAWs will also include some software effects to help polish up your recordings, like EQ and compression. This will help the sound of your podcasts go a long way, but there are some extra tools that may be useful to add to your arsenal.
For example, plosives and sibilance in a recording are a huge issue. They’re difficult to remove and create huge spikes of distortion in a recording. Usually, they can be prevented with good mic discipline and a pop shield, but if it gets into a guest’s self-recorded audio, you might want to find a solution to deal with it.
The same goes for clipping, interference, ambient noise, and any number of issues that will rear their heads from time to time.
Fortunately, there are some tools available to repair broken audio or prevent these issues in the first place, and depending on what’s available in your software of choice, it might be worth investing in them. Even if you’re using a free recording and editing software like Audacity, its plugin integration will let you invest in some external software solutions to help expand its abilities and improve your audio.
iZotope provide a huge range of audio tools for voiceover and audio editing that can help clean up signals whilst also improving them. They have several simple utilities like their AI-powered vocal enhancement tool VEA and their all-in-one suite of audio repair effects RX 10 Elements. Antares have some useful options too – like their Aspire breath control and Sybil de-esser.
Combine some of these or whatever similar tools your chosen software comes with alongside your software’s built-in EQ and compressor – or perhaps a dynamic EQ like TDR Nova GE or Melda MDynamicEq, which can boost or attenuate frequencies based on their volume for a cleaner, smoother sound – and you’ll have a professional sound for a pretty great price.
Mixer
 Mixers are a great way of recording a lot of inputs at once. Audio interfaces tend to have between one and eight inputs, often only one or two headphone outputs, no built-in effects, and limited routing options. As such, sometimes mixers can be a better option for aspiring podcasters.
Mixers can be desktop mounted, and you can connect anything from one to 24 microphones at once, making it a singular hub for your podcast sound. Each microphone preamp channel on a mixer will likely have phantom power for condensers.
There are also usually several line input channels, which can be great for instruments and running sound from external devices like tablets or smartphones.
Often with built-in effects like filters, EQ, and compression, and sometimes – in the case of digital mixers – buttons to launch samples. Mixers tend to have faders and gain knobs, allowing you to get more control over the microphone input volume as well as the output volume of the channel.
Mixers aren’t necessary for most podcast setups but can offer more options for bigger podcasts with more guests and microphones. They may need to be connected to an audio interface to convert them to your computer, so they can be a little more unwieldy.
However, many modern mixers have stereo USB interfaces added, so they can connect directly to your computer and record their master output in stereo that way too, so look out for that feature to make your setup a little simpler!
Acoustic treatment
 Acoustic treatment is entirely optional for podcast setups, but it can really help step up the sound quality of your recordings. Acoustic treatment consists of porous panels or foam blocks that are designed to absorb sound and reduce reflections.
These can come in a wide range of forms, with different shapes to maximise absorption and spread reflections: wall panels, ceiling clouds, and bass traps.
Wall panels are designed to handle the midrange, being mounted on the wall and preventing echoes. This is great for creating a more even vocal sound as the midrange is where most of the human voice tends to sit.
Things like bass traps can be useful if you get a lot of low-end rumble in your recordings, but they are pretty large and unwieldy which they need to be to absorb the longer wavelength of lower sounds.
Ceiling clouds attach to the ceiling and prevent reflections from above.
All of these can make your sound cleaner, but may not always be practical for smaller podcast setups. We’d recommend investing in at least some wall panels to hit the key spots on the wall that cause echoes and feedback.
To set up wall panels correctly, you’ll want to think of problem areas directly around you and your microphones. Sound tends to travel in a straight line, so think about key spots in the walls opposite where you sit, and directly behind you for the most impact.
To identify issues, it can be helpful to walk around and clap, and if you hear repeated, fast, metallic echoes called “flutter echoes”, reflections are an issue around there. For more advice on acoustic treatment, check out our guide to room acoustics.
How to start a podcast – our advice
So, how do you go about starting a podcast? Of course, to start with you need to think over your equipment and decide what you want your setup to look like. This can be determined by your desired format, and the space you have available to you, so it can help to figure out your format first and work from there.
Working out your format will require a few key questions. Are you talking over the internet with people? Are you talking face-to-face? Are you going to be on camera? Are you going to be at home or in a dedicated studio space? Are you talking to guests or have a regular co-host? And, of course, whether you want it to be a roundtable discussion, interview format, educational podcast, comedic podcast, or even an episodic narrative podcast. All of this can affect what equipment would be best for you.
Choose a topic you’re passionate about
Make sure you choose an interesting topic – something you’re passionate about is a great start, it can be something you know a lot about and have expertise in, or sometimes it can be fun to bring people on your journey of learning about the topic starting as a layman. Either way, make sure you have an interest in it, as long as your passion for the topic comes through clearly, the audience will be drawn in by that.
Know your audience
Consider your audience, who is the show for, and how can you appeal to them. Of course, the primary draw should be you enjoying the process of podcasting but knowing your audience can help you work out who you’re talking to, the tone of your show, as well as how you present yourself and the topic. Your audience will also help you figure out what platform to host your show on.
Music, artwork, and blurb
Knowing what you want and who your audience is should also assist you in figuring out some of the extra elements, like introductory music and art, as well as how you write blurbs for the show or individual episodes on platforms like Spotify or YouTube. All of this is important for drawing people in.
Having good, professional sound quality in your show, good intro music (or even if you want intro music at all), and eye-catching artwork will give off a strong sense of style that will draw listeners in and attract the kind of people you want as your audience.
FAQs
What is the best equipment to start a podcast?
The best equipment to start a podcast includes a high-quality microphone, headphones, and audio recording software. These tools ensure clear audio quality, which is crucial for engaging your audience. A pop filter and shock mount can further enhance sound quality.
What is the best thing to record a podcast with?
A high-quality microphone is the best thing to record a podcast with. It captures clear and crisp audio, making your podcast sound professional. Additionally, using dedicated recording software allows for better control over the final audio output.
What equipment do I need to be a podcast guest?
To be a podcast guest, you need a good-quality microphone and a reliable internet connection. These ensure your voice is clear and there are no disruptions during the recording. Headphones can also help prevent echo and feedback during the conversation.
Final thoughts
To sum up, we’ve covered a lot of options for the best podcasting equipment. While there’s a plethora of great products available, only you can determine what works for you, and hopefully we’ve given you the pointers to work out what you need! From USB microphones to large-format mixers, accessories and acoustic treatment, you can achieve a professional, polished-sounding podcast.


")


0 Comments