

So, you want to put on a live show. What gear do you need? How do you set up that gear? And how do you use that gear?
With these questions in mind, you might think live sound is confusing. And it sometimes is! But it doesn’t have to be that way for you.
On the stadium-rock side of things, live sound rigs can cost thousands upon thousands, and take whole dedicated teams days to set up. On the other end, it can be as simple as a microphone and a speaker.
And this is where I’ll start; if you’re a busker, this is all you need to know.
If you want to take your show indoors, there’s a bit more to it. The next level we’ll explore will add more elements like mixers and power management.
And by the end, you’ll know enough to set up a live rig in a small venue: awesome!

Level 1 – Live Sound for Buskers
All it takes is a portable speaker and a mic: congratulations, you’ve started your live sound journey!
Portable speakers come in many shapes and sizes. They offer an all-in-one solution for amplification. Some even come with wireless mics, giving you everything you need to get started.
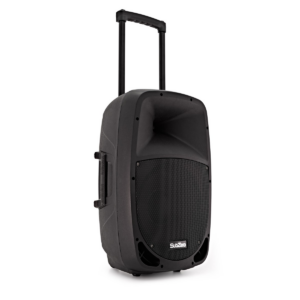
Take the SubZero SZPA-P12 for example. It is a battery-powered speaker so you can take it with you anywhere – perfect to busk with. It comes with two wireless mics and Bluetooth® connectivity. You don’t even need any cables!
This is ideal if you are singing along to backing tracks or going acapella. It even features inbuilt mixing and equalisation capabilities (more on this later).
Of course, you might want to choose your own microphone. And how do you go about doing that?
It’s time for . . . drum roll please . . .
A Brief Guide To Choosing Live Microphones
For the best live vocal sound, you should go with a dynamic cardioid vocal microphone.
These don’t require power, have a more focused pick-up, and are made to be robust. Shure’s SM58 has a reputation for being indestructible.
This is great when you don’t want to pick up any other sound than your voice and be able to plug into any input.
Condenser microphones might look cool, but don’t use them for live vocals! They pick up a wider frequency range and are much more sensitive. As a result, they’re ideal for studio use, but a nightmare on stage.
Many portable speakers come with integrated wireless mics. But if they don’t, or you want to expand your setup, it’s worth knowing about these.
If you want to go hands-free, you’ll need to invest in a microphone stand such as the Boom Mic Stand by Gear4music. These are easy to use and can be adjusted to match your height and positioning.
Once you’ve got a mic, you might be wondering: “how do I plug it into my speaker?” You might also have instruments you want to plug-in too.
With this in mind, I present to you . . .
Jack and XLRs: A Cable Story
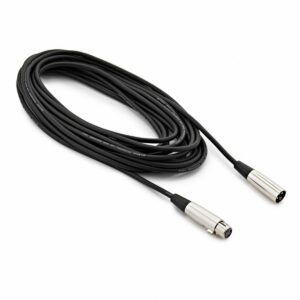 The two most common cables you’ll need on your live sound voyage are XLR cables and 1/4″ Jack cables.
XLR cables are most often used with microphones and speakers. They have a male end, with three pins, and a female end, with three-pin sockets.
You plug the female end into your mic and plug the male end into your speaker or mixer. Once you’ve done this, you’re essentially a live sound expert. Congratulations!
1/4″ jack cables are most often used for instruments such as guitars and keyboards. They are the same on both ends, so it doesn’t matter which way round you plug it in.
Before buying a speaker or mixer, always check what kind of inputs it accepts. Most will have both XLR and 1/4″ Jack inputs, but you can never be sure.
Think about how many mics you are using and how many instruments you are using. Then you can make your decision based on what you need.
Some even come with combi inputs, which means they can accept both XLR and 1/4″ Jack inputs. Nice!
Media Playback: For Backing Tracks, Dancing, and More!
You might want to play music or backing tracks from your speaker, and there are a few ways to go about this.
The easiest option is streaming music from your device via Bluetooth. Most modern speakers have this enabled and can provide seamless connection in no time.
If you need a wired connection, you’ll have to check the connectivity of your speaker. Some will have RCA inputs, and some will have a 3.5mm Jack input.
You could even load your music to USB, plug it into your speaker, and play it! This is a feature of the SZPA-P12, along with an SD card slot, Bluetooth, and an RCA input.
As with cables, it’s good to research what connectivity you need for your show to avoid disappointment.
Get Out and Get Busking!
You should now know all you need to know to produce live sound for busking.
Here’s a quick overview of the gear mentioned so far:
- A battery-powered PA system
- Microphones
- Microphone Stands
- XLR cables for wired microphones
- 1/4″ Jack cables for instruments
You might not need all of these, but we think this is a good base to get started with.
And this isn’t just for busking. This setup is also ideal for small parties, public speaking, and more.
For a more detailed overview of getting started with busking, check out our detailed guide.
Level 2 – Live Sound On The Road
If you’re graduating from busking to playing indoor venues, you might want to upgrade your live setup.
Playing outside with battery-powered speakers is one thing. But live sound inside venues is a different deal altogether.
You can still have a portable rig, but there’s more to think about.
How will you power your gear? Where will you place your gear? What’s the difference between active and passive speakers? And when you start adding more singers, more instruments – how do you make them sound good together.
The answer, my friend, is a mixer.
Mixing Live Sound – A Short Introduction
Mixers take sound sources and let you balance them. The mixed output is then sent to a PA speaker.
You can balance your sound in several ways. But the easiest way is changing sound levels.
If your singer’s too loud, turn the level down. If they’re too quiet, turn the level up. Well done – you’re now a sound engineer!
You should also adjust the level of the output in the same way. Sometimes if everything is too loud, or too quiet, this is where you should go first.
Most mixers have more controls and settings than just the sound level. However, we’ll keep it simple for now and stick to that control – no need to overcomplicate things.
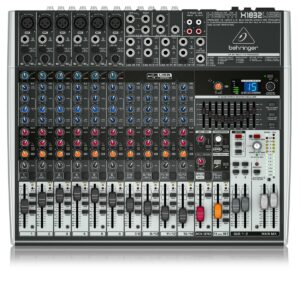
So how do you go about choosing a mixer? Again it comes down to your personal needs. Like speakers, you’ll want to look at the type of inputs/outputs and the amount of inputs/outputs.
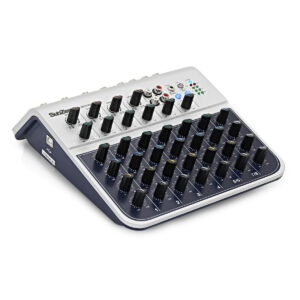
There are lots of great small format mixers, ideal for their small footprint and portability. The SubZero SZ-MIX08USB is one example, with eight inputs to choose from – four of which can be microphones.
You might not need an external mixer at all, your PA system might have all the mixing capabilities you need. Speaking of PA systems . . .
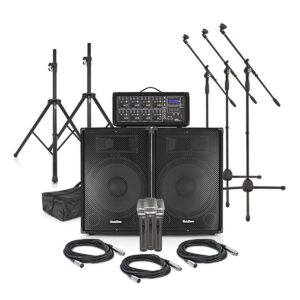
Upgrading Your Portable PA Setup
 Battery-powered speakers are great for busking and small rooms. But you might want a PA system that:
- Has a Few Extra Features
- Fills a Larger Space
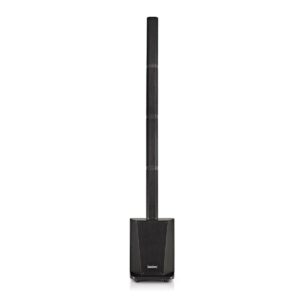
This is where column PAs come in.
Most of the time they are comprised of a Sub-unit and an array of speakers stacked on top of it. The SubZero L410X is one example of this.
If you only have two inputs, this could work on its own. It has two combi inputs (jack and XLR), with mixing dials for each. It also has DSP capabilities. And what is DSP you might ask?
DSP stands for Digital Signal Processing. It refers to digital sound effects and processes, rather than purely analog methods.
This can be a powerful tool, allowing for in-depth equalisation (balancing sound frequencies), reverb effects, and much more. For example, the L410X has several presets tailored for the sound of different venue types and uses. Some examples are “club”, which boosts the bass for dance music, and “speech”, which aids in signal clarity.
You won’t need to think about the ins and outs of DSP more than this. But it’s worth knowing what it is at this basic level when buying your speaker.
So – back to PAs.
The HF array on column arrays gives you good directivity for your sound. And this means more people will be able to hear your sound more clearly.
What this also means, is you could get away with a single column PA system for your setup. But this is something you’ll want to play by ear. Quite literally.
We recommend starting with a single system, and if it doesn’t fill the venues you use it in, consider buying a second one.
Power Management – A Short Diversion
By now you’ll have quite a bit of live gear. And that means you’ll need to think about power management.
This is the boring part, I know. And you might question why we’re talking about it at all. But for beginners, we have a few recommendations.
Firstly, you’ll need extension cables – and enough of them. There’s no point bringing just a four-gang extension lead when you have five things to plug-in.
Secondly, you should get extension cables in a range of lengths. When you’re playing in lots of different venues, you won’t always have a mains supply close by. Therefore, it’s worth getting one of those long, coil-up extension leads.
Finally, you’ll want to get enough extension leads for different positions. What if you have a speaker on one end and a guitarist with a massive pedalboard on the other? And speaking of positioning – where should you put everything?
Positioning Your Live Setup
 When setting up your live rig, there’s one basic rule you should always try to follow: have the mics behind the speakers.
If your mics are in front of your speakers, there’s a higher chance of them picking up sound from the speakers. This creates a feedback loop that sounds horrible and makes your life difficult. Avoid this and you’re already a better live sound engineer than most.
For speaker positions, you want to get maximum coverage in the room you are in.
For two speakers, it’s common to place them on either side of performers. If you are using a single-column array, you could place this in the middle of the stage.
The mixing desk should be accessible for whoever has to use it. If you’re the one playing and doing sound, then you’ll want it closer to your performance space. If you or someone else is just doing live sound, then set up the mixer in a place where you can hear how the audience hears.
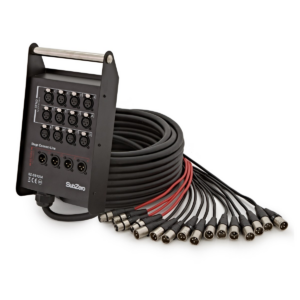
For this, you might need to consider investing in a stage box. This, simply put, is an extension for your mixer’s inputs and outputs, and allows to you position your mixer away from the performance.
Everything else is more or less up to you. And if you’re putting on band gigs, just look how your favourite groups do it!
We’re on the Road to Live Sound
If you are taking your show on the road, and you have a small to medium-sized setup, then this is all you need to know.
Here’s an overview of all the gear mentioned in this section:
If you want to learn more about portable PA systems, check out our article on Bose’s offerings and our guide to systems for indoor and outdoor events.
Level 3 – Live Sound for Small Venues
Looking beyond the portable setup?
If you are looking for something more permanent, for a bar or small venue, there are a few extra things you might want to consider.
You’ll want two decent PA speakers, a sub, a larger mixer, and maybe even lights.
Going beyond integrated PA systems, there’s a lot more to think about.
Live Speakers: Passive vs Active
When looking for speakers, you’ll find that there are both passive and active options available. So what’s the difference? And what do you need to know before using both?
Active speakers have integrated amplifiers and are powered by mains. The speakers I’ve introduced so far have all been active. These are easy to set up – you plug in the power, turn it on, and plug in the output from a mixing desk. Then you’re pretty much ready to go.
Passive speakers need separate amplification and are not powered. To amplify them you need a separate power amplifier or a mixer with amplification capabilities.
There are a few more elements to think about here. But it doesn’t have to be any harder to set up. The lack of power requirements removes a step you have to think about.
You have to think about what your requirements are.
Active speakers have everything integrated, and sometimes have extra features like DSP and onboard mixing.
They can, however, be harder to replace because everything’s integrated. And because of the latter, active speakers are heavier and more expensive.
On the other hand, passive speakers don’t generally have any onboard extras. But this makes them easier to fix if they break. And you can change out elements easily. You’re not stuck with anyone’s power amp, for example. They’re also lighter and sometimes cheaper (not factoring in the extra cost of a power amp).
In terms of passive speaker systems, the SubZero SZPA-815 300W 15″ PA System is a good start. It comes with an 8-channel digital player that drives the 15″ speakers.
You get speaker stands, microphones, mic stands, and mic cables too. So in terms of a full setup for a small venue, this is a great start.
 Monitoring
Now you’re up to this stage you need to start thinking about monitors. These are speakers that face towards performers, so they can hear what they’re doing.
The classic look you might already know is wedge-shaped speakers placed on the stage floor.
A basic setup you could go for is a speaker on either side of the stage. If you have bigger productions you might want monitoring for individual performers, such as the drummer.
The levels of these can be controlled from your mixing desk, and communication with performers is vital at this stage. The monitors are intended for them after all!
One recommendation is the SubZero C10MA Active Stage Monitor, which has 3-band EQ for getting the sound just right.
Mixing Live Sound – Part 2
The previous mixing section kept it quite basic. But there are a number of extras you have to think about once your setup starts to grow.
There are still lots of mixing desk elements that we haven’t mentioned. That would have to be its own article.
With that in mind, the most important thing for small venues and shows is setting the gain. Or in sound engineer terms gain staging
Gain Staging: A Potted Guide
Not all sound sources will enter your mixer at the same level. You can use input gain controls to compensate for this.
If an input is entering the desk much too quiet – then turn the gain up. If an input is entering the desk too loud, then turn the gain down.
You’ll want it so that inputs are as loud as they can be, without distorting. (Though it’s a bit more nuanced than that, check out this great article to hear why).
And you’ll want inputs at a comfortable level while the fader is at 0dB. This gives you room to turn up an input’s volume, while also providing plenty of room to turn it down.
When setting the gain, you should ask performers to play as loud as they will be playing.
Do this in a sound-check or before performance. You’ll want to be leaving the gain controls alone during performance, and using the faders to adjust levels.
If this is all too much, then there are modern digital mixers that have automatic gain settings. One such mixer is the Flow-8 Digital Mixer by Behringer.
Subwoofers
Subwoofers provide the low-end in live sound.
If you need big bass, it’s worth considering adding one of these to your setup.
Like your main speakers, these come in both passive and active forms. So this is something you’ll want to consider on a case-by-case basis.
You can often have your main output going to your sub, and then from your sub to your main speakers. This can be ideal for a more streamlined setup.
The SubZero C15SA is an active option. It features a 15″ woofer and 1400W maximum power, allowing you to hear and feel the bass.
Subwoofers can be set up anywhere. This is because their frequency range is low enough that it doesn’t have specific directivity like higher frequency speakers do.
A Small Venue Live Sound Setup
So if you’re setting up a small venue, this is most of what you need to know.
Here’s an overview of all gear you need for this:
Conclusion
Hopefully, you feel more prepared to dive head-first into live sound. If you’re interested in learning more about live music, why not check out our stage lighting guide below?
Find Out More | Stage Lighting Guide


")


0 Comments