

If you’re looking to add vocals to your mix, you’ll need the right setup and to follow a few simple steps. Particularly when working in FL Studio, recording is a pretty straightforward process.
In this guide, we’ll show you how to record vocals in FL Studio, walking you through everything you need to know, from setting up your gear to hitting that record button.
Key takeaways
To record vocals in FL Studio, you’ll need to follow these steps:
- Ensure you have all the equipment necessary, including a microphone and audio interface
- Connect your equipment to your computer
- Open FL Studio and set up your audio interface in the settings
- Configure the mixer by creating a new track, selecting the input source, and arming the track for recording
- Select a file destination for recordings to be stored on your computer
- Enable headphone monitoring and set a recording countdown timer
- Get singing!
The equipment you’ll need
Before you start recording your vocals in FL Studio, you’ll need the right equipment to get up and running.
To record vocals in FL Studio, you’ll need:
- A microphone: For vocals, a condenser microphone is typically the best choice as it will capture the detail and nuance in your voice better than a ribbon or dynamic microphone. A good microphone suggestion would be the Shure SM4 for its crisp low-end and detailed highs
- An audio interface: The audio interface converts signals from your microphone into a digital format that can be processed by your computer. It’s the brains of the entire setup. The perfect solution for this is the Focusrite Scarlett 2i2 due to it’s super user-friendly design
- A computer: It might sound obvious, but a powerful enough computer that’s capable of installing and running FL Studio is essential. Check the system requirements of the software to ensure compatibility
- Cables: No setup would be complete without the appropriate cables. You’ll need an XLR cable to connect your microphone to your audio interface
- A pop filter: To remove harsh plosives (“P” and “B” sounds) from your vocal recordings, you’ll need a pop filter, a simple yet very effective microphone accessory. The Dual Pro Studio Pop Shield by sE Electronics is ideal for the job
- Headphones: You’ll need a pair of headphones to monitor your vocals when you record and to ensure no feedback from your speakers gets picked up by your microphone. A closed-back pair of headphones like Sennheiser HD 280 PRO II are ideal for isolating sound and providing you a clear listening experience
How to record vocals in FL Studio
1. Set up your hardware
Now that you’ve got all your gear, let’s walk through how to set it up. First, connect your microphone to your audio interface using the XLR cable. Ensure the connection is secure and switch on phantom power (+48V) on your audio interface after you’ve connected your microphone and turned the interface on. Condenser mics need this extra power to work properly, so don’t miss this step!
Next up, plug your audio interface into your computer using a USB cable. Your computer should automatically recognise the interface, but if it doesn’t, you may need to install the correct driver. Most audio interfaces don’t need any intervention, but you can grab them from the manufacturer’s website if needed.
Once that’s sorted and your computer recognises your interface, you’ll need to adjust the gain on your interface. This controls how loud your microphone input is. Turn it up gradually while singing into the mic and aim for the level meters to remain in the green when singing regularly and only just into the orange when singing at your loudest. Avoid spiking into the red zone, as that means your signal is clipping and might distort.
Finally, connect your headphones to the audio interface headphone-out so you can hear everything clearly while you record. Now, you’re all set!
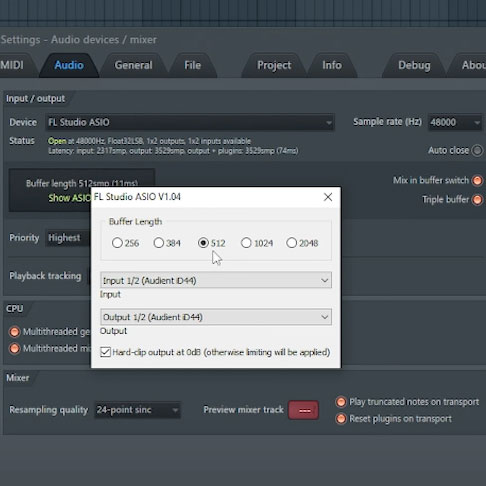
2. Set up the audio interface in FL Studio
Now that your hardware’s good to go, let’s set up FL Studio for recording. First, head over to Options > Audio Settings and choose the ASIO driver that matches your audio interface. Using ASIO is key because it keeps latency to a minimum, which means no annoying delays between what you sing and what you hear.
Next, adjust the buffer size. For recording vocals, a buffer size of around 256 samples is a sweet spot. This setting balances smooth performance with low latency, so you can record without glitches or noticeable delays. Once you’ve done that, you’re ready to dive into recording.
3. Configure the mixer
To start recording vocals in FL Studio, you’ll need to configure the mixer. Open the mixer by pressing F9 or clicking the mixer icon in the toolbar. Once open, select an empty Mono track to dedicate to your vocal recording. A good idea is to rename the track “Vocals”, so you can easily identify what’s on that audio track.
On the right side of the mixer, there’s a section called Input/Output. Click the input dropdown and choose the input source for your microphone. If you’ve plugged your mic into Input 1 on your audio interface, select Input 1 here.
After selecting the input, you’ll need to arm the track for recording. Do this by clicking the small disc icon on the track, which tells FL Studio to record audio on that specific track. Once armed, the track will be ready to capture your vocals.
To monitor your input while recording, ensure that input monitoring is enabled by pressing the headphone icon. This allows you to hear your voice through the headphones in real-time, helping you adjust your performance as you go.

4. Choose a location for your file
Organisation when recording vocals is key! Before hitting record, you’ll need to choose a location to save your files. In FL Studio, navigate to Options > File Settings and select a folder on your computer where your audio files will be saved.
It’s a good idea to create a dedicated folder for your project, ensuring all your vocal takes and related audio files are kept organised in one place. This makes it easier to access and manage your recordings later on when editing and mixing your track.
5. Start recording!
Alright, we’re almost there – let’s get to the fun part! At the top of the screen, you’ll see the main toolbar. This is where all the important buttons are for recording. To start, hit the record button (the little circle), and FL Studio will ask if you want to record audio or MIDI. Choose audio since we’re recording vocals.
Before you begin recording, turn on the countdown timer – this gives you a few seconds to get into position before the recording starts. It’s super useful if you’re recording yourself. You’ll also want to enable the metronome to help keep your timing steady as you sing, especially if you’re working with a beat or backing track.
Don’t forget to enable the handy input monitoring feature. This is what lets you hear your voice through your headphones in real-time as you record, so you can keep your pitch and timing in check with the track.
Once everything’s set, hit play or press the space bar, and you’re good to go! When you’re finished, just hit stop and listen back to your take. Easy as that!

FAQs
How do I use a mic in FL Studio?
To use a mic in FL Studio, you need the Producer Edition or higher. On Windows, select an ASIO driver in the audio settings (F10), and on macOS, ensure microphone access is enabled. Connect your audio source, set the mixer input, and arm the track for recording.
Is recording vocals in FL Studio good?
Recording vocals in FL Studio is excellent for achieving professional sound. With advanced plugins like newTone for pitch correction and a variety of creative effects, it is well suited to vocal recording and mixing to achieve high-quality results for polished, radio-ready tracks.
Do you need an audio interface to record vocals in FL Studio?
To record vocals in FL Studio, you will need an audio interface. Along with a microphone, you’ll need an audio interface, headphones, and a computer with FL Studio installed. The audio interface allows sound from your microphone to be recorded into your computer and into your DAW.
Final thoughts
Now that you know how to record vocals in FL Studio, you’re all set to start your next session. We’ve covered everything from setting up your equipment, configuring the software, and arming tracks to understanding recording features like the metronome and countdown timer.
With these simple steps, you’ll be recording clean, professional-sounding vocals in no time. Just remember to have fun and focus on getting the best takes possible.
Looking for more information on FL Studio? Why not take a read at our dedicated guides to using FL Studio and adding plugins to FL Studio. Want to level-up your home vocal recording game? We’ve got you covered with our piece on recording vocals at home.


")


0 Comments