

Looking to use your new audio interface, but don’t know where to start? In this simple guide, we’ll walk you through the process step-by-step, showing you how to set up an audio interface. We’ll discuss everything from connecting your interface to your computer to more advanced topics such as DAW mapping and making connections.

Key takeaways
- Get your drivers – Make sure your interface has the right drivers or software installed, so everything works smoothly from the start.
- Plug it in – Plug the interface directly into your computer for the most stable and reliable connection.
- Set up your DAW – Set your DAW to use the interface for both input and output so all your sound goes exactly where it should.
- Inputs/outputs – Keep things tidy by enabling only the inputs and outputs you actually need.
- Select sample rate/buffer size – Choose a sensible sample rate and buffer size to keep your recordings clear and your computer running comfortably.
- Hook your speakers/headphones – Connect your headphones or studio monitors to the interface for accurate, straightforward monitoring.
- Choose your input – Use the right input for your mic or instrument and adjust the gain gently until the signal feels just right.
- Turn on phantom power – Switch on 48V phantom power only if you’re using a condenser microphone.
- Test your levels – Do a quick test recording to check your levels and make sure nothing is clipping.
- Monitor your inputs – If your interface offers direct monitoring or software control, this will make recording feel even easier.
How to set up an audio interface
1. Install the required drivers/software
 Before you start, check whether your audio interface needs any drivers or control software. Most modern USB and class-compliant interfaces work straight out of the box, especially on macOS, but many still rely on dedicated drivers to unlock proper performance, low-latency recording, and full compatibility.
Brands like Universal Audio, Focusrite and PreSonus usually prompt you to download their setup tools, while others require specific software to run their interfaces correctly. Installing these drivers ensures your computer recognises every input and output, keeps your recordings stable, and prevents annoying glitches later on.
It’s also the easiest way to access firmware updates and useful extras like mixer panels, routing options, or bundled plug-ins that come with your new interface.
2. Connect the interface to your computer
Once your drivers are sorted, you’ll want to connect your audio interface straight into your computer. It’s best to plug it directly into a USB or Thunderbolt port rather than using a hub, as hubs can cause power drops, random disconnects, and extra noise in your recordings.
Keeping the connection simple gives your interface a clean, stable link to your system, which is especially important for USB-powered units like the Focusrite Solo or SSL 2.
A direct connection also helps your interface perform at its best, reducing latency and keeping everything running smoothly while you record. If your interface comes with its own cable, use that one first, as it’s usually designed to give the most reliable results. It’s a small step, but it makes a big difference once you start laying down tracks.
3. Select your input/output device in your DAW
Once your interface is plugged in, your next job is to tell your DAW to actually use it. Every recording program has its own audio settings menu, and it’s usually just a case of choosing your interface as both the input and output device.
It’s a small step, but it’s what allows your DAW to receive sound from your mic or instrument and send playback back through your headphones or monitors.
Interfaces show up in the list as soon as they’re connected, so you’ll simply need to choose the right one. If you skip this, your computer may fall back to its built-in mic and speakers, which can make everything sound a bit off.
4. Enable your inputs/outputs for recording
 Once your DAW is talking to your interface, it’s a good idea to enable only the inputs and outputs you actually need. You can usually do this in your audio preferences, and keeping things streamlined helps your system run more efficiently.
It also keeps your routing clear, which makes life much easier when you’re just getting comfortable with recording.
If you’re using a simple two-input interface like the Audient iD24 or the Lewitt Connect, you might only need one mic input and your main stereo output. Turn off anything you’re not using to reduce the strain on your computer and keep your session uncluttered.
5. Set your sample rate/buffer size
Your sample rate and buffer size play a big part in how smoothly your recording setup runs, so it’s important to set them properly. Most people start with a sample rate of either 44.1kHz or 48kHz, as both offer clear audio without putting too much strain on the computer. Higher sample rates are available, but they use more processing power and aren’t always necessary when you’re just getting started.
The buffer size controls how quickly your computer processes audio. A lower buffer gives you less delay when monitoring, but it requires more power from your system. A higher buffer is easier on your computer, although you may notice a slight delay. A practical starting point is 256 or 512 samples. You can adjust it later depending on how responsive or stable your setup feels.
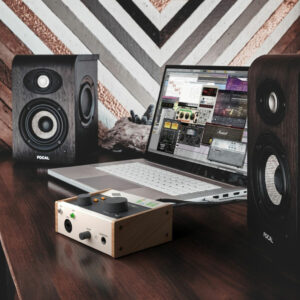
6. Connect your studio monitors/headphones
Once your interface is all hooked up and ready to go, it’s time to set up your monitors or headphones. This simply means connecting your headphones or studio monitors to the output on the interface. Most interfaces include a dedicated headphone jack on the front and balanced outputs on the back for speakers.
Plugging straight into the interface keeps everything in one place and gives you far better control over volume and clarity.
If you’re using headphones, options like the Rode NTH-50 plug straight in and give you a detailed, comfortable monitoring experience. For speakers, we recommend a pair of SubZero SZSM-4X studio monitors to connect easily to the main outputs and get a clean, reliable sound for mixing.
7. Connect your mic/instruments
 Most audio interfaces use combination inputs that accept XLR and 1/4-inch jack cables, so it’s just a matter of choosing the right connector. Use an XLR cable for microphones, and use a 1/4-inch jack if you’re plugging in a guitar, bass, or keyboard.
You should also check whether the input is set to mic, line, or instrument level so your signal comes through cleanly.
If you’re recording vocals, a mic like the Warm Audio WA-87jr gives you classic vintage tonality, while a more affordable option, such as the Lewitt Ray, keeps things clear and budget-friendly. Once connected, slowly raise the gain until you get a healthy level without clipping.
8. Switch on phantom power (if you’re using a condenser mic)
If you’re using a condenser microphone, you’ll need to switch on phantom power to get it working properly. This is the little 48V button found on most audio interfaces, and it sends power through the XLR cable to activate the mic’s internal circuitry. It’s perfectly safe to use, but it’s always best to switch it on after the microphone is plugged in so everything powers up smoothly.
Some interfaces activate phantom power across all inputs, while others let you control each channel separately. Condenser mics rely on this power, so if you’re getting silence from your setup, this is usually the missing step. Once it’s switched on, your mic will connect properly and give you the clarity and detail condensers are known for.
9. Capture a test recording to check levels
Before you dive into a full recording, do a quick test take to make sure everything sounds clean. Arm a track in your DAW, hit record, and speak or play as you normally would.
Keep an eye on your input meter while you do this. You want a healthy signal that sits comfortably below the red, as clipping happens when the level peaks too high and distorts the sound.
If things look a bit hot (high volume), simply lower the gain on your interface until the meter stays in a safe range. If the signal is too quiet, gently raise it. This small test helps you catch issues early, whether you’re using a vocal mic, a guitar, or anything in between.
Once everything looks steady, you’re ready to record properly with confidence.
10. Turn on direct monitoring and map your controls
 Some audio interfaces offer handy features like direct monitoring and DAW mapping, which can make your workflow feel much smoother once you’re comfortable with the basics.
Direct monitoring lets you hear your voice or instrument straight from the interface, rather than waiting for it to pass through your computer.
This gives you near-instant feedback and avoids any distracting delay while you record. It’s especially useful for singers and guitarists who want a natural, responsive feel.
More advanced interfaces also include DAW mapping or control software, which lets you adjust levels, routing, and mixer settings from a dedicated panel.
This can help you fine-tune your setup, balance multiple inputs, or create custom headphone mixes.
FAQs
How do I set up my audio interface?
To set up your audio interface, connect it to your computer via USB or Thunderbolt and install any required drivers. Then select it as your input/output device in your DAW or system settings. Adjust buffer size and sample rate for optimal performance and low latency.
What do I plug my audio interface into?
Plug your audio interface into your computer using USB, Thunderbolt, or FireWire, depending on the model. You can also connect instruments, microphones, speakers, or headphones to its input and output ports. This allows full control of audio recording and playback.
How do I make a PC recognise an audio interface?
To make a PC recognise an audio interface, install the correct drivers from the manufacturer’s website and connect the interface via USB or other supported ports. Then set it as the default audio device in Windows sound settings and your DAW’s audio preferences.
Final thoughts
Learning how to set up an audio interface becomes much easier once you understand the small steps involved, and, hopefully, this guide has helped everything feel a bit more approachable.
We’ve covered the essentials, from installing drivers and choosing inputs to setting levels and sorting out your monitoring, giving you a clear path from unboxing to recording.
Every setup is slightly different, but once everything’s connected and working smoothly, you’ll be ready to record with confidence, whether you’re a producer, musician, or content creator.


")


0 Comments